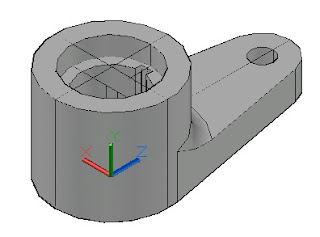
For
example, we are going to convert 3d object as below to 2d drawing by using
FLATSHOT command.
The
steps are as following:
a.
Assume that firstly we are going to create 2D
Drawing of Top View. So that, we
have to change the view to be Top View. Go to ribbon of Visualize and choose
Views menu then click Top View icon. It will appear as below.
b. Type
FLATSHOT on command line, and then it will come up FLATSHOT dialog box as below.
c.
Notice that the result of 2D drawing which is
going to be created will be formed as a block.
d.
Choose continuous line for foreground lines and
dashed line for obscured lines. So that we can distinguish whichever visible
lines (foreground line) and hidden line (obscured lines).
e.
Then click Create
button. It will appear as below.
f.
On command line it also will come up :
Specify
insertion point or [ Basepoint Scale X Y Z Rotate
] :
Type B and specify basepoint. Assume we choose
center point of the circle as basepoint (point number 1 as following picture).
g.
After that on command line, it becomes :
Specify
insertion point :
Assume the insertion point is on the point
of number 2 (it also on the center point of circle solid)
h.
Then the instruction on command line is :
Enter
X scale factor <1> :
Just press Enter, as we choose the scale
factor is 1 as default.
i.
Enter Y
scale factor <1> :
Just also press Enter.
j.
Specify
rotation angle <0> :
Just press Enter.
k.
Finally we get 2D Drawing of Top View on XY
plane.
l. With the same step,let you create 2D drawing of
Front View and Right Side View.
m. On
SW Isometric View (ribbon Visualize – Views menu and SW Isometric icon) it will
appear this following.
n. If
we hide the layer of 3D object, it will appear this following.
o.
We have to separate it to become as below.
p. Arrange
the composition with multiple operation like Rotate3D, Move, etc. so that it
becomes as below.
q.
On Top View :
r. Notice
that each of views are blocks. So that we can edit individually as block
editing, such as change line type scale of dashed line. Finally after block editing we can get 2D
projection as below.
s. We
can add center line, dimensions, and text to complete this 2D drawing. So that
finally we result 2D projection drawing as follow
inally after block editing we can get 2D
projection as below.
It is very easy, right? May be useful !!


No comments:
Post a Comment