
For
example, we are going to convert 3d object as below to 2d drawing by using
VIEWBASE command..


Before
we start to use VIEWBASE command, we need to set up the projection type.
So
on the command line, let you type VIEWSTD and then click Enter.
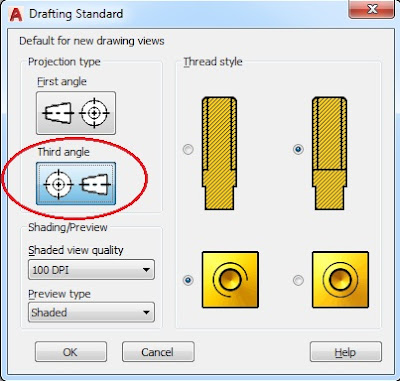
It
will appear dialog box of DRAFTING STANDARD as below :

If
you usually use American projection type, then you choose projection type of
Third angle.
If
you usually use European projection type, then you choose projection type of
First angle.
Ok,
for this example let us choose First angle.
Then
click OK button.
After that we are going to begin VIEWBASE command.
After that we are going to begin VIEWBASE command.
The steps
are as following :
a.
Type VIEWBASE on command line.
b.
Then it is coming up the instruction:
Specify
model source [Model space File] <Model space>:
c.
Just click Enter on the keyboard as the model
source is from Model space.
d.
Then it is coming up the instruction:
Select
objects or [Entire model] <Entire model>:
e.
Select some objects if there are only some
objects of the entire objects on model space which are selected. Or just click
Enter on the keyboard if we select entire objects on model space.
f.
Then it is coming up the instruction:
Enter
new or existing layout name to make current or [?] <Layout1>:
g. Type the new layout name if necessary, or just
click Enter on the keyboard if Layout1 is the layout name.
h. Then notice that it goes to Layout1 space. And
notice on the menu bar it appear toolbar of viewbase command as below and then
you set up the icons that are inside the red circle marking as below.

i.
Just click Enter on the keyboard, then it is
coming up the instruction:
Enter
a view creation option [Base only base and Projected] <Base and Projected>:
j.
Just click Enter on the keyboard as we want to
display base and projected view, then it is coming up the instruction:
Specify
location of base view or [Type sElect Orientation Hidden lines Scale
Visibility] <type>:
k.
Notice that the cursor is directly change into
the base view. Then position it to the proper place and click left button of
mouse.

l.
Then it is coming up the instruction:
Select
option [sElect Orientation Hidden lines Scale Visibility Move eXit]
<eXit>:
m.
Just click Enter on the keyboard.
n.
Then it is coming up the instruction:
Specify
location of projected view or<eXit>:
o.
Then position cursor on the screen as either top
view or right view or other views and click left button of mouse.

Then
position cursor to make top view and click left button of mouse.

p.
Finish the step by clicking Enter on the
keyboard.
q. The 2d drawing finally appear on the layout1
space.

r. And
then you can complete it with dimensions and text to finish it all.

It’s very easy, right? Let you try it.
No comments:
Post a Comment